I recently had a client that wanted to move their on-premises databases to their Azure environment, specifically to a managed instance in Azure. When I started doing research on the steps to complete this migration, I was bogged down by having to look at different documents and blog posts to determine all the necessary steps. Follow along as I discuss the necessary components and steps, I took to complete this migration:
Items that you will need before you get started:
- Azure Account
- Azure Blob storage Account
- Azure Managed Instance
Backing Up the Database
Prior to beginning the migration, it is imperative to work with the client and agree on a maintenance window that has minimal impact on the business. Inevitably, there will be some downtime for any applications connected to the migration. Once a window is selected, it is important to shut down any application that is connected to the database prior to starting your on-prem back up; This ensures no new data will be written to the on-prem database while migration to Azure Managed Instance. Once the applications have been shut down, a backup of the on-prem database can be conducted.
To perform the backup, begin by performing a native SQL backup of the on-premises database. The backup can be saved to the network location on-premises.
Once the backup is complete, upload the backup to the Azure Blob Storage by utilizing the upload option via the Azure portal. Navigate to the blob storage account, to the container, and select the Upload tab at the top. This lets you browse your computer or a network location to find the backup you want to upload. Utilizing this feature is a good option for a one-time migration – for multi migrations, repetitive automations can be set up.

Note – It is possible to back up the database directly to Azure Blob storage; however, this requires more steps and requirements needed, in my case we were performing this action 1 time so setting up a repeating backup to URL process was overkill.
Restoring the Backup to Managed Instance.
Once the backup is in Azure Blob storage, it is time to restore the backup to the Azure Managed Instance. Before you start the process of restoring a database on a managed instance, you will need to drop any database with the existing name. You are not able to restore a database over an existing database like an on-premises SQL Server, you must drop the existing database before restoring the new copy. As for restore itself it is like doing it on-premises except for a few varying steps. You can utilize the restore database GUI; however, it is a good idea to script it out to run in a query window. Follow the same steps to add your source of the backup until you get to adding the source of the backup.
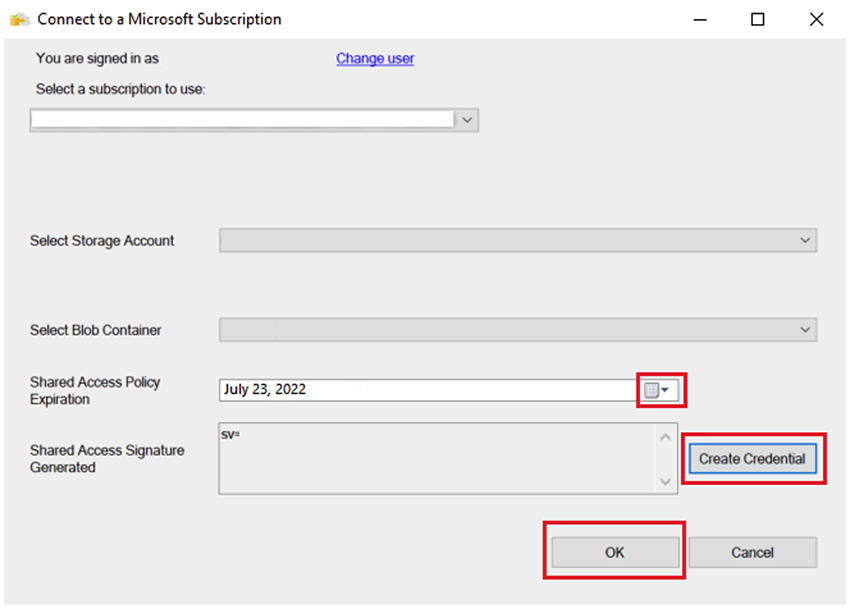
Since it is in Azure Blob storage, the only backup media type supported is URL. When you click ‘Add,’ it takes you to a page where you will want to select which Azure storage container you want to use. Click ‘Add’ on this page as well and you will be taken to the Azure sign-in page. From this page you will select the Azure storage account, the blob container, and you will be able to create Shared Access Signature credentials. These credentials are needed for accessing the backup we uploaded to Azure Blob storage earlier.

Once you click ‘Create Credentials’ and then ‘Ok,’ you will go to the page where you select the file in the blob storage. You select the backup you want to use and click ‘Ok.’ Then back on the general page of the restore database GUI, you can select ‘Script’ and script it out to a query window. I prefer to run things via script rather than via GUI. Once you script out the restore, execute the script, or if you prefer the GUI, then click ‘Ok’.
Dealing with Copying Permissions.
There are many ways to copy/migrate permissions for SQL Server, so I am not going to cover specific ways to perform the copy/migrate; however, I do want to point out that the create scripts for logins in a managed instance are different than the create scripts for login in on-premises SQL Server. If you use a method that scripts them out of the on-premises SQL instance, you will have to manually change parts of the create scripts to work in the managed instance. The create login TSQL is different in a managed instance, it is ‘CREATE LOGIN [LoginName] FROM EXTERNAL PROVIDER’. You can utilize Find and Replace to update the create scripts to work in a managed instance. Once you have the create scripts updated to work in managed instance you can copy them to the managed instance and run them. You may also want to consider running a cursor to check and fix orphaned users after migrating the permissions. Once permissions have been copied, be sure to test and verify all permissions.
Pointing Connections
At this point, you will need to copy permissions to the Azure Managed Instance. Once copied, test and verify all permissions. After the database has been moved successfully, all application connections will need to be pointed to new database locations. Test and verify all connections following the connection string updates. Following verification, restart the applications backup pointing at the new location.
Summary
In summary, the migration of the 50 GB on-premises database to Azure Managed Instance was very quick, it took less than 20 minutes. The bulk of the time was spent on prework steps when it comes to setting up an Azure subscription, a manage instance, storage account, etc. that I did not cover here. My client already had all this setup, so for this request I did not have to perform those steps. I also want to mention that the part that took the longest, step wise, for me was the uploading of the backup to Azure blob storage.
So, in summary, the migration of on prem database to Azure Managed Instance was very quick. I was only dealing with an approximately 50 GB database, so nothing large for this request. Once I got the steps down, I was able to migrate their database from on-premises to Azure managed instance in less than 20 minutes for this 50 GB database. There is a bunch more prework steps when it comes to setting up an Azure subscription, a manage instance, storage account, ect. that I did not cover here. My client already had all this setup, so for this request I did not have to perform those steps. I also want to mention that the part that took the longest, step wise, for me was the uploading of the backup to Azure blob storage